


About Pimcore Single Sign-on
This bundle provides single-sign on support for Pimcore backend and also frontend login. This allows to maintain user credentials and roles on external authentication providers.
Delegate user management to an authentication provider has a lot of advantages:
- user only has to remember one password for all used services
- encryption and security is expected to be higher on those authentication providers as their whole business model highly depends on it
- administration has a single system where they can create users - so nobody has to create Pimcore accounts manually
- administration has a single system to disable users - when an employee leaves a company, you can disable all logins with a single click
- optionally, assign Pimcore roles based on the „groups“ which the user belongs to in the authentication system
Supported Authentication Providers
Currently the bundle supports OpenID, SAML and LDAP authentication providers. Support for OAuth2 will come soon.
OpenID is supported by a wide range of applications like
- Microsoft Azure Active Directory / Entra ID
- Auth0
- Okta
- Keycloak
- and others
Configuration in Pimcore Backend
Configuration can be done directly in Pimcore backend under Settings > Users / Roles > Single Sign-on Configuration:


The bundle gets shipped with detailed instructions how to set up auth applications at the authentication provider, where to find the necessary keys / settings and where to paste those secrets in Pimcore.
Adding Authentication Providers
You can add as many auth providers as you want (e.g. if your internal users use a different auth provider as your Pimcore agency).
You can also configure default roles for each authentication provider. Those rules will get applied to newly created users. If an existing user logs in the default roles will not get applied.
Enabling the SSO Login Button
For each authentication provider (except for LDAP providers) a new button will be added to Pimcore’s login screen:

After the user clicks this button, he will get redirected to the authentication provider. There he can log in (or perhaps already is logged in). Afterwards he will get redirected to your Pimcore and is already logged in. Internally a usual Pimcore user will get created based on the information of the authentication provider (e.g. username, email, roles). Consequently all Pimcore features work the same as with manually created user accounts.
OpenID Setup
On the auth provider site you have you create an application with https://your-pimcore.com/sso/redirect as callback URL. The remaining configuration settings depend on the used auth provider.
Information about OpenID configuration for certain auth providers:
Microsoft Azure AD: Step-by-step Configuration
To use Azure AD as authentication provider, you have to create a new Azure AD app:
1. Log in to your Azure account and navigate to Azure Active Directory > App registrations.
2. Select + New registration to create a new app.
3. Enter a name of your choice in the Name field.
4. Set Redirect URI to https://your-pimcore.com/sso/redirect - please replace the domain name to your real one.
5. Click Register
6. Copy the Application (client) ID from the app configuration page and paste it in the Pimcore SSO configuration’s field Client ID.
7. Navigate to the app’s configuration page. If you just completed the previous step, you should already be on this page. Otherwise, search for your app name in the App registrations list.
8. Select Certificates & secrets.
9. Select + New client secret. Provide a description and an expiration length that follows your security organization’s guidelines. Then click Add.
10. Copy the newly-created client secret and paste it in the Pimcore SSO configuration’s field Client Secret.
11. In Pimcore SSO configuration, as Discovery URL enter https://login.microsoftonline.com/[TENANT]/.well-known/openid-configuration - please replace [TENANT] with your tenant id.
12. In Pimcore SSO configuration, as Scopes use openid, profile, email (and optionally groups if you want to map Azure AD / Entra ID groups to Pimcore roles)
13. In user field mappings assign:
Pimcore field Azure AD field
Username / login unique_name
Given name given_name
Family name family_name
Email unique_name
Groups / Roles groups
Other Authentication Providers
Auth0
If you are not sure what to enter, please write an email to help@blackbit.de.
After configuration there will be an additional button on the Pimcore login page. This can be used to authenticate on the auth provider site and then be redirected and logged in to Pimcore.
If you choose a Default Provider you will automatically get redirected to the auth provider’s login page when you access https://your-pimcore.com/admin.
LDAP Setup
For LDAP authentication providers no additional button gets added to the login screen but the normal login form gets used. With those credentials the LDAP provider gets requested and if the credentials are valid, the user gets logged in. Same as for other authentication types internally a usual Pimcore user will get created and the LDAP profile fields get applied ( e.g. username, email).
When using LDAP as authentication provider, you have to configure
Base DN: Base DN for the directory (example: dc=example,dc=com). Search DN: (Read-only) user’s DN, which will be used to authenticate against the LDAP server in order to fetch the user’s information (example: cn=your_search_dn_user,ou=users,dc=example,dc=com).
SAML Setup
To log in via SAML you need to configure:
- Entity ID
- ACS URL
- X509 Certificate
Role and Group Mapping
Mapping Authentication provider data to Pimcore user
You can map the fields which get provided by the configured authentication providers to update the corresponding Pimcore user’s account data, for example to keep email address up-to-date or to assign roles.
Role mapping
Mapped Groups / Roles will automatically be assigned as roles to the just logged-in user. Non-existing roles will automatically get created (at first without any permissions).
In addition, you can configure Default roles. These roles will automatically be assigned to newly created users. They do not get applied to already existing users.
Single Sign-on as Default Login Method
You can configure one authentication provider to be the default one. When this is done, requests for Pimcore backend https://your-pimcore.com/admin will automatically get redirected to the authentication provider to login there. Afterwards the user will get sent back to Pimcore backend being logged in.
Events & Extensibility
sso.logged-in
The sso.logged-in event gets triggered on successful login. The following event arguments get provided:
user: The found / created \Pimcore\Model\User object
data: Associative array with all data which got returned from authentication provider
savePimcoreUser: boolean value to define if the Pimcore user should get saved (default: true)
provider: The name of the used SSO provider (as configured in Pimcore backend)
Frontend Integration
The following instructions are only important if you want to add SSO to your Pimcore-based frontend application (= website). If you only want to log in to Pimcore backend, the following section can be ignored.
Show Login Buttons in Twig templates
To integrate single sign-on in frontend applications, you can add the following code in your Twig templates:

Overriding the Default HTML Output
If you want to get auth provider data as JSON, please use json parameter with value true. If json not provided, buttons will be shown as html.

JSON Output & Redirects
Furthermore, you can set redirectUrl parameter to redirect user after successful login. If redirectUrl is not provided, the user will get redirected to the requested page - if this is not available (because the login page was called without referer), it will redirect to default URL / (start page).

You can change the HTML output by overriding the @BlackbitSingleSignOn/frontend_button.html.twig template - for example copy the following code to <Pimcore root folder/templates/bundles/BlackbitSingleSignOn/frontend_button.html.twig:
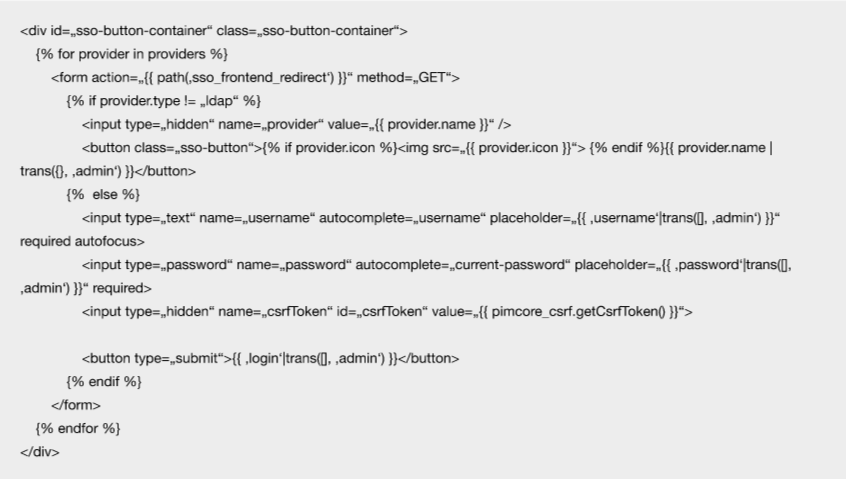
and adjust it to your needs.
Event for Successful Login
You can subscribe to the event sso.logged-in which gets triggered on a successful login.
For example, in services.yaml register your event subscriber

Then create SsoLoginListener class in src\EventListener folder with following code:

Login Check & Logout
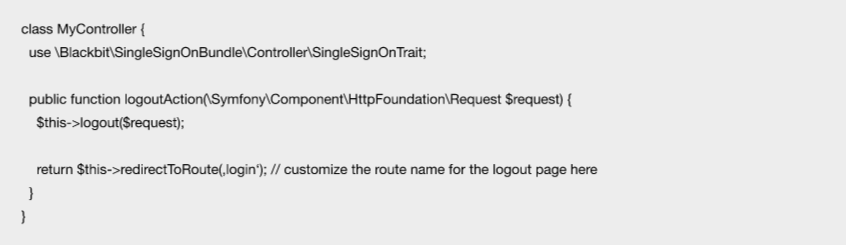
Authorization check
To check if a user is logged in, you can use the SingleSignOnTrait in your controller:

Logout
For logout you can use the SingleSignOnTrait:
Version
- Current Version 1.3
Pimcore version support
- ≥ Pimcore 5.4, 6, 10, 11,
- Platform Version 2023, 2024
Technical support
- E-Mail Support: hilfe@blackbit.de
- Helpdesk: help.blackbit.com
- Documentation https://github.com/BlackbitDigitalCommerce/pimcore-single-sign-on
SLA
- Individually according to agreement.
Installation service
- Individually according to agreement.
Invoicing
- The usage fee is paid annually in advance via credit card in accordance with the Pimcore Extension Subscription Agreement.
Proprietary license
- Dual License